
This post may contain affiliate links.
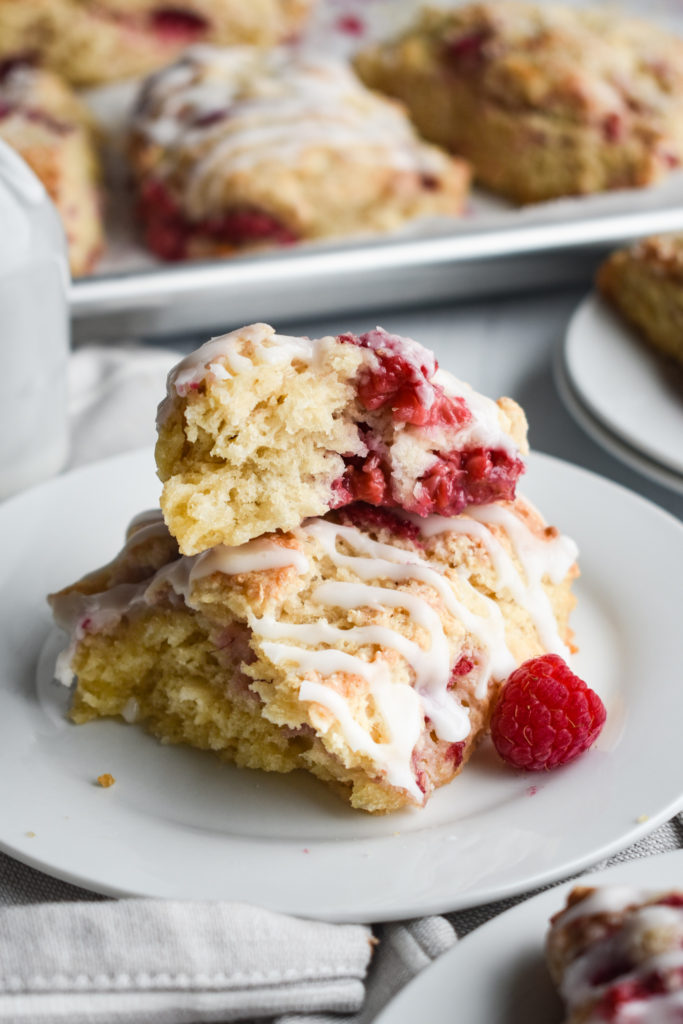
These Raspberry Scones are crisp around the edges and soft & moist in the center. With a drizzle of icing or a layer of coarse sugar on top, these will be your new favorite breakfast treats!

I remember the first time I tried a scone and thought to myself “why on earth would someone prefer these over a muffin or a donut?!” It was so dry, crumbly and overall just mehhh. Is that your experience with scones??
Well I’m here to tell you tell you that scones (when made properly) are absolutely AMAZING! If a muffin and a biscuit collided, this is what I’d imagine. They’ve got the moistness and softness of a muffin, yet the flaky exterior and buttery flavor of a biscuit. I promise….scones don’t have to be dry. Just follow my tips below and you’ll be well on your way to an incredible (and impressive!) scone!


What ingredient makes scones rise?
Baking powder is the leavening agent in these scones. Therefore, it’s important to double-check that your baking powder is still good by looking at the expiration date.
Although the baking powder gives these scones the majority of their rise, the chilled butter helps. The chilled, grated butter forms moist little air pockets that make these hold their shape and oh so tender and delicious! I adapted this recipe from Sally’s Baking Addiction scone recipe and I think you’re gonna LOVE it.
What is the secret to making good scones?
Well that’s a loaded question! 😉 I’ve broken it down into three super important tips, so follow these and my recipe below for the road to scone success!
- Don’t overwork the dough. This is probably the most important! As you can see in my process photos below, the dough is just barely combined when I form a circle and cut it into triangles. Overworking the dough will develop more gluten and make for a chewier scone.
- Use cold butter. Again, this is HUGE. I find that the best way to get moist, flaky scones is to grate the butter before incorporating it into the dough. And it’s a whole lot easier to mix in than with a pastry blender.
- Chill before baking. Since you’ve taken the time to grate the butter into little pieces, you want to keep those butter pieces in tact. If you put the scones in the oven when they’re room temperature, they’re much more likely to spread more than you want and be flat.
How to Make Scones: Step by Step
Start by measuring out the dry ingredients in one bowl and the wet ingredients in a separate bowl. Also, before you start mixing, make sure that you butter is well-chilled.


Using a cheese grater, shred the cold butter then add it to the bowl of dry ingredients. Gently combine the butter with the dry ingredients then drizzle the wet ingredients on top.


Use a fork to combine the ingredients. It’s kind of like making a pie crust – you don’t want to stir vigorously, you just want to moisten the dry ingredients.

Next it’s time to add the raspberries. But before you add them, measure out a cup of berries and cut them in half if they’re quite large. Toss them in 2 tablespoons of flour. I’ve found that this helps keep them from getting the rest of the dough too wet.
Add the flour-coated raspberries to the scone mixture and gently stir them in. The dough will be slightly crumbly, which is totally fine! The dough is now ready to shape!


Dump the scone mixture onto a clean, lightly-floured surface and shape into a circle that’s about 10 inches in diameter. Use a sharp knife to cut the circle into 8 even triangles. Use a spatula to transfer the scones onto a parchment-lined baking sheet.
Refrigerate the scones for at least 30 minutes while you preheat your oven. It’s important that the scones are cold and the oven is piping hot when you add the scones to get the best texture!


One more thing before you bake these….decide how you want to top them!
- Sprinkled with Coarse Sugar: If you’re going this route, lightly brush the tops of the cold scones with milk or cream then sprinkle with coarse sugar.
- Topped with Icing: If you’re going this route, skip the sugar on top and they’re ready to bake!
Bake the scones and before you know it, you’ll be sitting down with a cup of coffee and a piping hot scone ready to be devoured! 🙂

Not ready to conquer scones yet? No worries!
I get it – making the perfect scone can be intimidating (though it’s really not that hard!;)) However, if you want to stick with muffins and quick breads for now, that’s cool too.
My peach muffins, homemade blueberry muffins and healthy double chocolate zucchini muffins are among my favorite. Pumpkin coffee cake is a delicious recipe, especially in the fall and cranberry apple bread is perfect around the holidays!
And if you ARE ready to conquer the perfect scone…. print the recipe below!

Raspberry Scones
Ingredients
- 2 1/2 cups flour
- 1/2 cup sugar
- 1/4 teaspoon salt
- 2 1/2 teaspoons baking powder
- 1/2 cup buttermilk (or 1/2 tablespoon vinegar + enough milk to equal 1/2 cup)
- 1 egg
- 2 teaspoons vanilla
- 1/2 cup salted butter grated*
- 1 1/4 cup fresh raspberries
- 2 tablespoons flour
- 2 tablespoons milk or cream
- coarse sugar (or icing for drizzle)
Instructions
- In a large bowl, whisk together the flour, sugar, salt and baking powder.2 1/2 cups flour, 1/2 cup sugar, 1/4 teaspoon salt, 2 1/2 teaspoons baking powder
- In a separate bowl, whisk together the buttermilk, egg and vanilla.1/2 cup buttermilk (or 1/2 tablespoon vinegar + enough milk to equal 1/2 cup), 1 egg, 2 teaspoons vanilla
- Add the grated butter to the dry ingredients then drizzle the wet ingredients over the mixture.1/2 cup salted butter
- Stir until just barely combined (you'll still see some flour that isn't incorporated, which is good!).
- Cut the raspberries in half and add them to a small bowl. Sprinkle with the additional 2 tablespoons of flour and toss to coat. Add the raspberries and carefully mix until dispersed throughout.1 1/4 cup fresh raspberries, 2 tablespoons flour
- Dump the dough on a lightly floured surface and form a circle about 10 inches in diameter.
- Cut the dough into 8 triangles and transfer them onto a parchment lined baking sheet.
- Put the scones in the fridge for 30 minutes (or more!) and preheat the oven to 400°F.
- Decide how you'd like to top the scones. If you want them sparkling with coarse sugar, you'll brush the milk over the scones and generously sprinkle with coarse sugar. If you want to add a drizzle of icing instead, hold off on the milk and coarse sugar.2 tablespoons milk or cream , coarse sugar (or icing for drizzle)
- Bake the scones in the preheated oven for 18-24 minutes, until golden brown around the bottom edges.
- Let the scones cool.
- Once they're cool, drizzle with a powdered sugar icing, if desired.
Notes
Nutrition
Note: Recipe was updated in 2026 to improve the texture of the scones. The flour was increased from 2 cups to 2 1/2 cups. It also now recommends cutting the raspberries in half and tossing them in flour so they don’t get too wet when baked. Same flavor, better texture…win win!


Really tasty! Just as you said, crispy on the outside and moist on the inside. This is a keeper recipe. Thanks!
This was a great simple recipe for my first time making scones from scratch (and not a store bought mix). Of course I over-mixed as you suggested not to and they were difficult to transfer to the sheet but of my goodness they were one of the best things I have ever made. So even though they weren’t pretty they were delicious!
Was wondering if the baked scones are freezable. Made them for an office event and everyone loved them, I would love to serve at Christmas but it seems a bit labor intensive for that busy morning. If I could make them ahead and freeze them would be great.
Yes! You can absolutely freeze the baked scones! ~Kelsey
Can I use frozen berries for this recipe?
Yes!
Very good. After reading previous posts, I felt that I hardly mixed the dough, but they came out perfectly.
I live at 10,000ft and these turned out perfectly without having to make any changes!
Love this recipe! Wondering if I could sub the raspberries for blueberries and add few tsp lemon zest to the flour mix would it bake the same?
That should work just fine! And yum – I love the blueberry/lemon flavor combo! 🙂