This post may contain affiliate links.
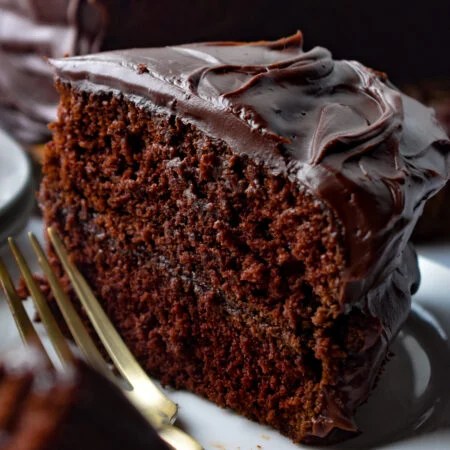
This Glossy Chocolate Frosting is ultra smooth, silky, beautifully shiny with a rich chocolate flavor that isn’t overly sweet. Perfect for spreading onto cakes, cupcakes, brownies and more, it adds an irresistible finish to any dessert!


Notes from Kelsey’s Kitchen
This recipe went through SO much testing and I think you’ll LOVE the end result. I tested several variations with and without chocolate chips, powdered sugar, corn syrup, etc. Long story short, the most glossy, luxuriously smooth chocolate frosting with the best flavor is the one I’m sharing today! I hope you enjoy! ~Kelsey
Glossy Chocolate Frosting Ingredients
- Cocoa Powder – You’ll want to use unsweetened cocoa powder for this recipe. If your grocery story carries it, I highly recommend using a Dutch-processed cocoa powder vs natural cocoa powder (more on that below).
- Sugar – White granulated sugar, NOT powdered sugar like most frostings!
- Sour Cream – Be sure to use regular full-fat sour cream (not light or fat free).
- Butter – I like to use salted butter, but unsalted butter will work great too.
- Heavy Whipping Cream – Do not substitute this!!
- Salt & Vanilla – Added flavor boosters!

Natural Cocoa Powder vs. Dutch-Processed Cocoa Powder
Though natural cocoa powder is easier to come by, many grocery stores now carry Dutch-processed cocoa powder as well. Both types are made with cocoa beans, but Dutch-processed cocoa powder is treated with an alkalizing agent to neutralize it (which makes it more mellow than the natural cocoa powder). I prefer Dutch-processed in this recipe though either will work!
|
Natural Cocoa Powder |
Dutch-Processed Cocoa Powder |
|
|
Appearance |
Light brown |
Dark brown, sometimes even close to black |
|
Flavor |
Brighter, slightly more tangy |
Deep chocolate flavor, but smooth and balanced |
|
Typical Uses |
Baked goods and any recipe that requires an acid to activate the leavening agent (ie baking soda). |
Frostings, hot cocoa, etc. Recipes that do not require an acid to react to leavening agent. |
|
Common Brands |
Hershey’s, Ghirardelli, Nestle |
Hershey’s Special Dark (my go-to), Ghirardelli Dutch Process, Droste, Guittard |
How to Make Glossy Chocolate Frosting
There’s no need to get out the stand mixer or electric mixer for this frosting! Grab a saucepan and a whisk and you’re set.
Start by adding the butter to a saucepan and melt over low heat.


Whisk in the sugar, cocoa powder and heavy cream. Keep the mixture over low or medium-low heat for about 5 minutes, whisking occasionally. You want the mixture to simmer for a bit to evaporate some of the moisture – it’ll still seem very runny at this point, but will thicken when chilled.
NOTE: You do not want to boil this mixture. Boiling the heavy cream could result in a grainy frosting (causes the dairy’s fat and liquid to separate). Therefore, keep it at a low simmer for a few minutes then remove from the heat.


Remove the chocolate mixture from the heat and stir in the sour cream and vanilla extract. Once it’s well-combined, you can run it through a fine sieve if you notice any clumps. The sieve will hold the clumps (discard these) and you’ll keep the rest!


Now you’ll have a runny, glossy chocolate mixture. Refrigerate for at least an hour to two. This gives the frosting a chance to thicken beautifully!
“Perfect frosting! Great mouth-feel, not too sweet, can still taste the chocolate flavor. The sweetness from the cake balances everything every well!” -Amanda

Frequently Asked Questions
When the frosting is at the right consistency, it’s absolutely pipe-able (see photos above). However, the cake/cupcakes will need to stay in a cool place until serving or it’ll get droopy.
This recipe makes 3 cups of frosting. That is enough for 2 tablespoons of frosting (a nice thick layer) on 24 cupcakes or for a nice layer of frosting on a 9×13-inch cake. You might consider making a double batch if you want a super thick layer of frosting on a 9×13-inch cake or have a large layer cake.
Most likely, it simply needs more time to chill. It’s also possible you didn’t heat the heavy cream quite long enough or added too much cream OR too little cocoa powder.


Other Recipe Ideas for Chocolate Lovers
- Chocolate Poke Cake
- Chocolate Cobbler
- Moist Chocolate Bundt Cake
- Brownie Cobbler
- Chocolate Dump Cake
- Brownie Bites

Glossy Chocolate Frosting
Equipment
- 1 saucepan
- 1 Fine Sieve optional
Ingredients
- 1/2 cup salted butter
- 1 1/2 cups sugar
- 1 1/4 cups cocoa powder
- 1/2 teaspoon salt
- 1 cup heavy whipping cream
- 1/4 cup sour cream
- 1 teaspoon vanilla extract
Instructions
- In a saucepan, melt the butter over low heat.1/2 cup salted butter
- Add the sugar, cocoa powder, heavy whipping cream, and salt; whisk to combine.1 1/4 cups cocoa powder, 1/2 teaspoon salt, 1 cup heavy whipping cream, 1 1/2 cups sugar
- Heat on medium-low heat for about 5 minutes, stirring frequently. You want the mixture to simmer (and cook off a little moisture), but do not want it boiling. Turn the heat down to low, if needed.
- Remove from the heat and whisk in the sour cream and vanilla until smooth.1/4 cup sour cream, 1 teaspoon vanilla extract
- Optional: Pour the frosting through a sieve to remove any possible clumps.
- Refrigerate the frosting for 2 hours.
- If the frosting has not thickened, let it chill longer.
- Stir the frosting. If it's thickened too much, microwave in 5 second spurts until it's the right consistency.
- This recipe makes 3 cups of frosting.
Notes
- Too Runny? Return the frosting to the fridge to set up more.
- Too Thick? Let set out at room temperature a bit to soften OR microwave in very short increments until desired consistency is reached.